Of all audio electroacoustic measurements, the most difficult and least certain is the measurement of headphones. There’s great controversy over frequency response targets and how they should be measured. One attempt at standardization is the common International Electrotechnical Commission (IEC) 60318, which only covers the range up to 8 kHz. IEC 60711 covers up to 10 kHz, but is oriented to in-ear (insert) headphones, and additionally, the fixtures compliant to that standard have the disadvantage of a built-in frequency response peak at 13.5 kHz.
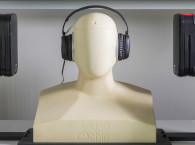
solid fixture the width of an average
head and containing two microphones.
A couple years back, Mike Klasco (president of Menlo Scientific) did a great overview of the measurement standards in the context of reviewing the GRAS 43BB ear simulator, which has become popular in the industry. He also covered more sophisticated solutions such as the KEMAR head-and-torso simulator (see Resources). This is required reading for a good overview of the subject area and included a very comprehensive bibliography. So I’ll not rehash this other than in occasional summary points.
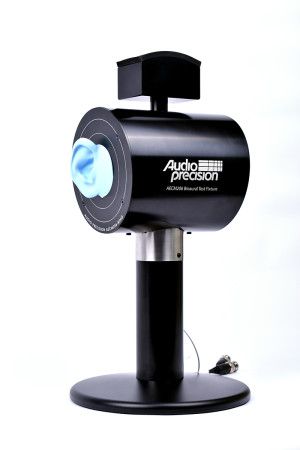
Likewise, Audio Precision published an applications note (see Resources) that also surveyed the field nicely and shows the sort of measurements that you can get using the AECM206 test fixture reviewed here. The AECM206 (see Photo 1) contains two microphones (constant current powered) and two acoustic couplers within its 21 lb. mass. It doesn’t have the torso shape or the realistic head of something such as the KEMAR, which is important for accurate measurement that takes into account the full head-related transfer function (HRTF), but at approximately $11,000 base price, it’s quite a bit less expensive.
First Impression
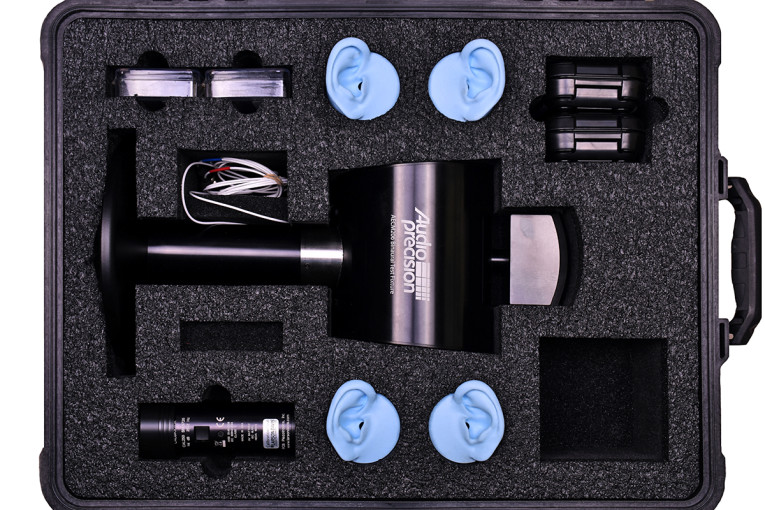
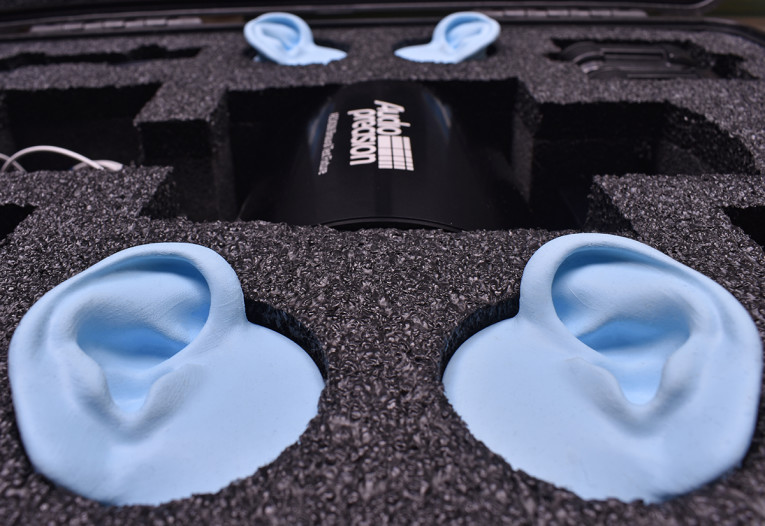
The AECM206 test fixture arrived in a heavy duty travel case that looked and felt like it would withstand a full-on attack by a horde of enraged monkeys (see Photo 2). On opening it, the first thing that struck me was the baby blue molded ears (see Photo 3), which made me immediately think of the Sherlock Holmes story, “The Cardboard Box.”
The ears are provided in two different durometers (hardness)— 35 Shore 00 and 25 Shore A — and are pressure-fit into the test fixture when used. The second thing that I noticed was the mass and solidity of the test fixture. It feels heavy and (acoustically) dead. There are two thin 1.5 m long PTFE coaxial cables attached to the internal mics and electronics, and the cables are terminated with standard BNC plugs. The mics are TEDs-compliant. When I attached them to the Audio Precision AP1701x acoustic interface, the calibration data was automatically sent to the APx515 test system. This was the first time I’ve had both TEDs-compliant mics and the AP1700x at the same time, and I have to say that this method of acquiring calibration data is slick!
One slight annoyance was that the black protective foam in which everything was packed was crumbly, and the ears (which have a bit of a tacky surface) had to be cleaned before use.
Test Setup
I placed the AECM206 on my test bench next to the AP1701x and the APx515. Connection and set up took only seconds and was incredibly convenient due to the TEDs system mentioned earlier. The only downside here is that the fan noise from the AP1701x could interfere with low level measurements. For very low noise floors, one would need to make long extension cables to the AECM206 microphones in order to increase the distance to the measurement system. Other than that, set up was totally uneventful, which is how I like it.
Out of necessity, this review is a bit limited — I only had the AECM206 for a couple of weeks, and there were a few hundred more things I wanted to do with it… That said, I had three sets of headphones available for basic measurements during the test period: intra-concha Apple EarPods that came with my iPhone, supra-aural Sony MDRZX110NC noise-canceling headphones, and Superlux HD681 circum-aural headphones.
Measurements
Audio Precision was nice enough to include in the package a Larson Davis CAL250 SPL calibrator, which is placed on the test fixture surface (minus the ears), and generates a 250 Hz signal at 114 dBSPL. This allowed me to check the mic calibrations, which were dead-on.
Typically, I measure microphone noise floors using my improvised BLANK chamber, that is, wrapping the microphone in a plastic bag and duct tape for protection, and then burying it in about 100 lb. of a mixture of sand and cat litter. Unfortunately, the size and geometry of the AECM206 precluded this method. However, since I am familiar with the microphone elements and electronics used in this test fixture, I can estimate the noise floor as being under 25 dB SPL with a 20 kHz bandwidth and A-weighting.
After inserting the stiffer ears, I ran some basic repeatability and frequency response checks. I conducted all frequency response measurements with a 300 ms logarithmic sweep (Farina chirp method). With the stiffer ears inserted, I ran a series of measurements on the Sony supra-aural headphones by placing them in the fixture, running a frequency response measurement, removing the headphones, replacing them, and running another measurement.
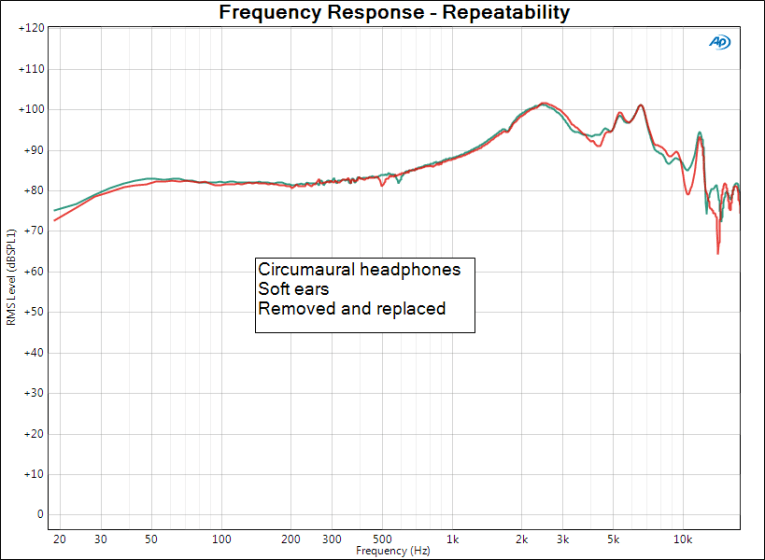
A plot of two sequential measurements is shown in Figure 1. The repeatability is pretty poor and certainly dominated by the details of physical positioning of the headphones and the degree to which the artificial ears’ compliance interacts with the headphone pressure. Indeed, a headphone user will almost unconsciously adjust the headphone position on his or her head until it “feels” right—a sort of tactile feedback system that can’t be achieved with a test fixture. The bottom line is that to get meaningful frequency response curves, multiple measurements must be taken and averaged. Audio Precision recommends a minimum of five repetitions, which seems reasonable.
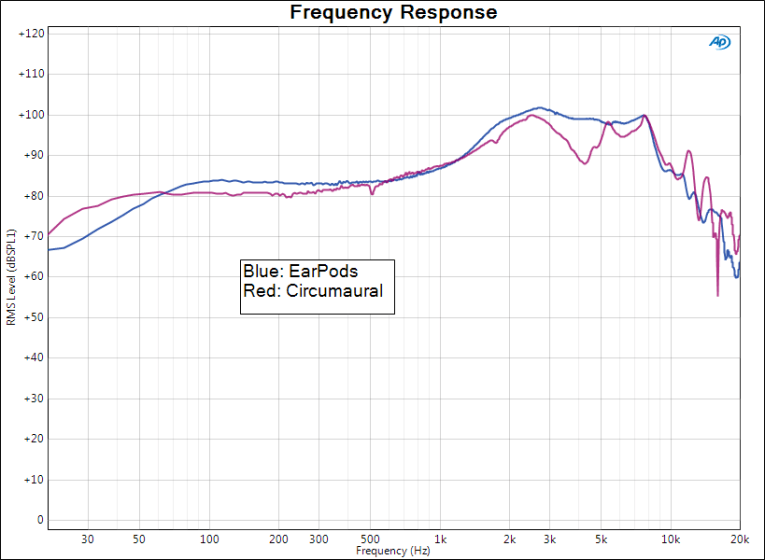
Figure 2 shows the frequency response of the Apple EarPods versus the Superlux headphones. As one might guess, the Superlux circum-aural headphones show a much smoother and deeper bass response, very much in accord with my subjective perception. Acquiring these data was rapid and uneventful, which is a compliment! Interpretation of headphone response curves above the bass region is controversial, and of course, this response will vary from person to person.
A few years ago, audioXpress Technical Editor Jan Didden and I were experimenting with an interesting device, an early version of the Smyth Realiser, which used psychoacoustic processing to cause the headphone image to appear to be emanating from a stereo pair of loudspeakers used in calibration and setup. Part of the calibration process was to measure response of the cavity formed by the headphones and the user’s pinnae. The device gave a remarkable illusion, but one interesting aspect was when Didden and I traded calibration curves (I used his calibration and he used mine, taken at the same spot with the same loudspeakers, but different pinnae) — the spectral balance of the sound was totally different and the localization illusion was destroyed. Clearly, ear shape is critical for frequency response!
Along that line of thought, one might ask what the effects of the ears are on the acoustical space. The provided ears are standardized to ITU-T P.57:2009, so they match exactly one pair of ears on Earth. Nonetheless, standardization at least provides a means of comparing data across experiments and facilities. Figure 3 shows the frequency responses of the Sony supra-aural headphones with the harder ears in place and removed. The differences are massive, which is not a great surprise. However, it is nice to see this quantified, and certainly suggests that we can get a good sense of how frequency responses vary from person to person with a bit of work casting ear replicas.

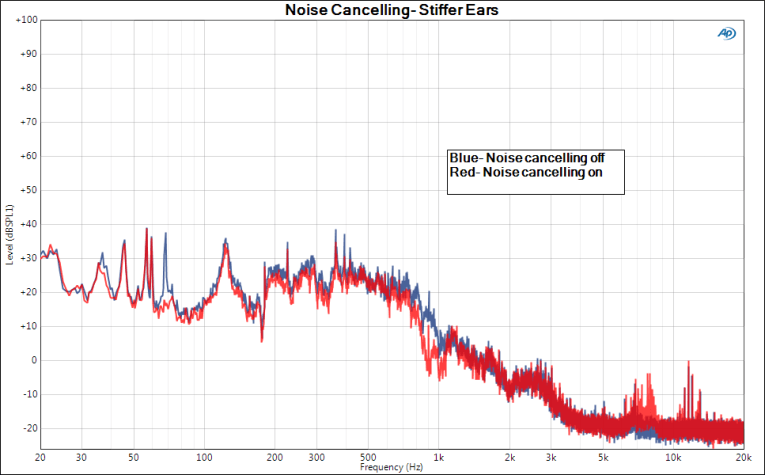
Another use for the AECM206 that suggested itself was quantifying the noise-cancellation feature offered in many headphones. The Sony supra-aural phones I had on hand had this option, which I often use when traveling by air. Sony’s claim is that the noise cancelling is 95% effective. Though the change in noise background and sound was quite noticeable with this feature switched on, my subjective impression was that the noise reduction wasn’t nearly that high. Objective data would be nice to have, so I took the opportunity My first attempt, using the stiffer ears, was not terribly successful (see Figure 4). The measured noise cancellation is insignificant, which suggested an experimental problem. I noticed that the headphones were resting on the artificial pinnae without significantly compressing them.
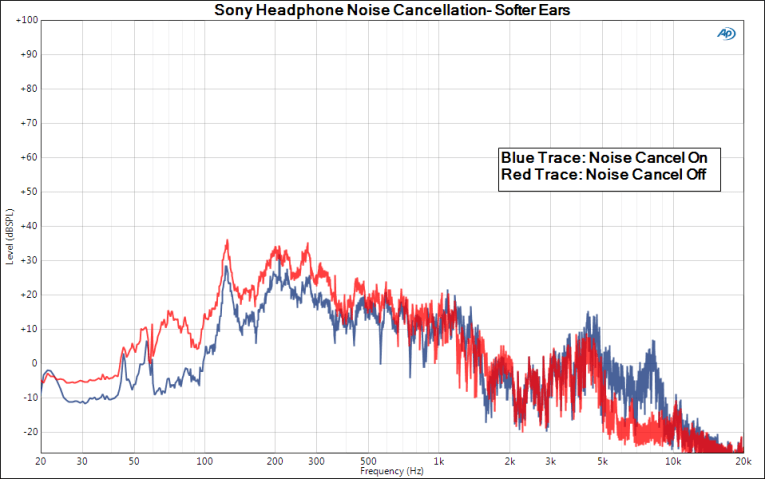
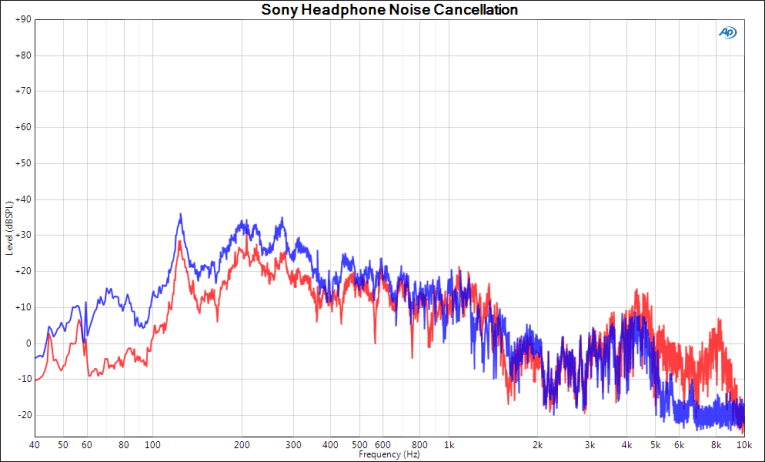
On my head, my pinnae were definitely pinned back, so I attributed the lack of noise cancelling to acoustic leakage due to the resulting poor seal. Substituting the softer ears, I obtained the results shown in Figure 5, which seemed much closer to my subjective impression. The effect of the noise cancelling was most pronounced at lower frequencies and was on the order of 5 to 10 dB. Interestingly, the noise cancelling feature added a bit of noise in the 5 to 10 kHz range, which reflected itself in a subjective impression of a more forward sound. I would like to explore this further at some point in the future.
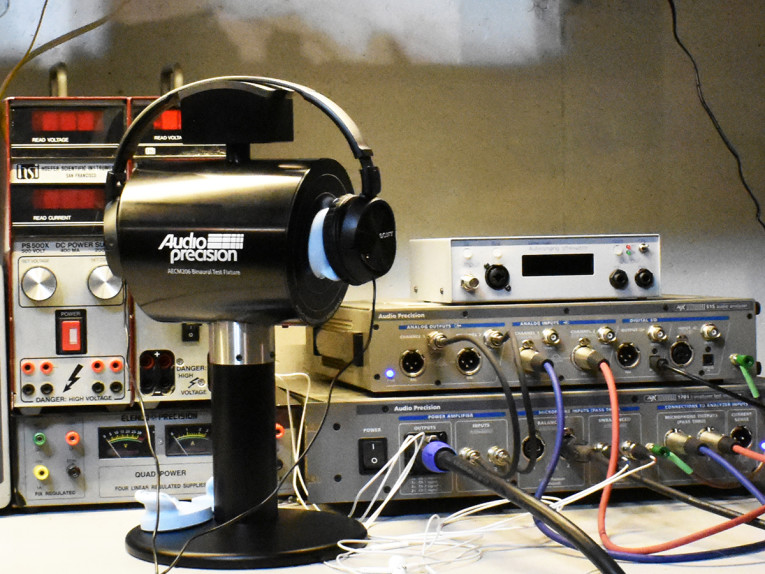
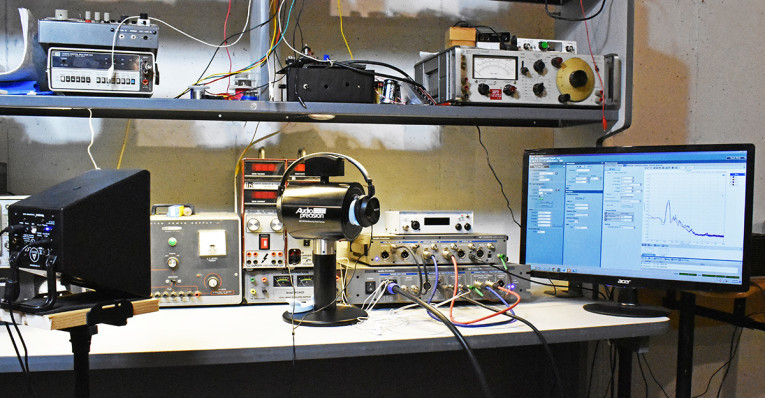
Once I had the ear issue sorted out, I thought it would be interesting to try a few different external acoustic stimuli to see how the noise cancellation operated. Photo 4 shows the test setup I used. I set up a Vanatoo Transparent Zero loudspeaker about a meter away from the AECM206 and blasted away with different sounds. Figure 6 shows the effects of noise cancellation with about 80 dB of pink noise impinging on the headphones. As before, the main reduction is at lower frequencies, and there’s a bit of an increase in noise in the treble region.
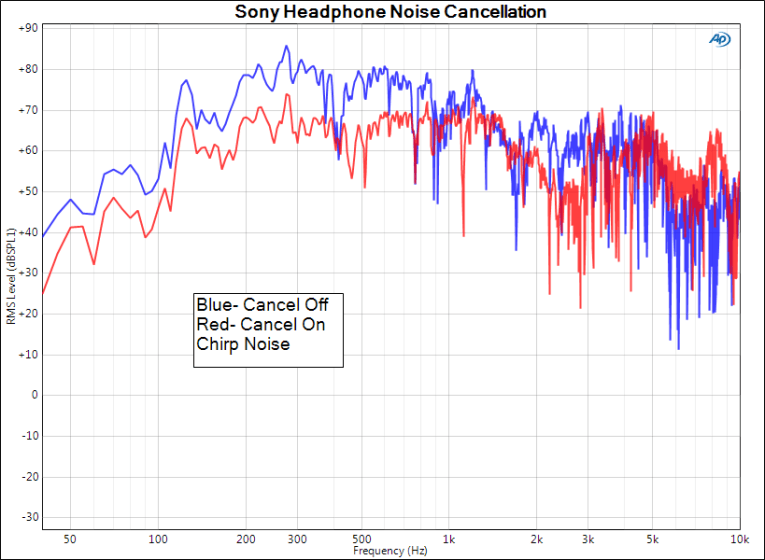
I also tried a swept frequency acoustic stimulus. Figure 7 shows the response of the noise cancelling with a 20 Hz—20 kHz 300 ms chirp. Again, it’s evident that the noise cancellation is most effective at lower frequencies and that there’s an increase in noise in the treble range. If I had more time with the AECM206, I would have tried some other signals and also varied the angle between the loudspeaker and the headphones. Perhaps if I can get my hands on this test fixture again…
Headphone Accessory Measurements
As another example of the usefulness of the AECM206, I conducted some measurements on a headphone accessory, the REVx REV33 accessory, which is a unit inserted between the headphone amplifier and the headphones that is supposed to reduce distortion, increase signal to noise, and reduce listening fatigue. In some simple electrical modeling and measurement work (posted on my website, see Resources), I found that the device had a transfer function resembling a low-pass filter. The AECM206 gave me an opportunity to confirm its operation with actual acoustic measurements on headphones.
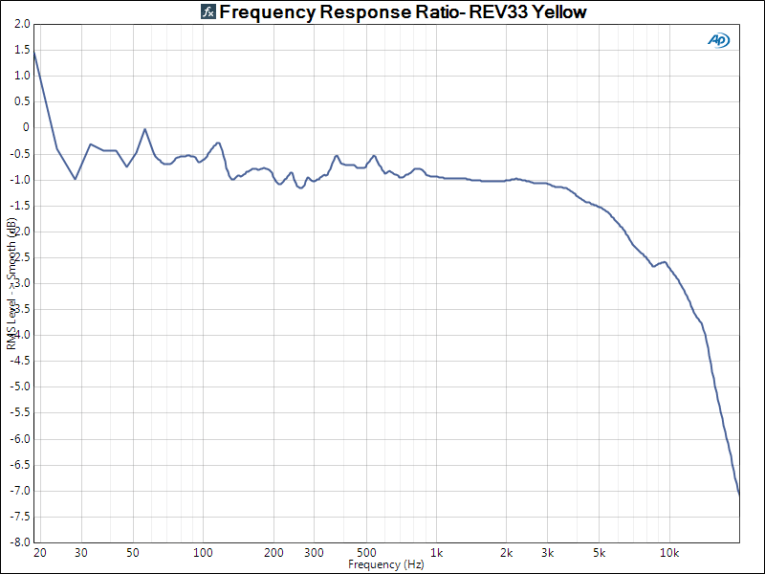
For these measurements, I used the circumaural Superlux headphones, since their impedance curve matched that of the headphones with which I originally tested the REV33. The softer ears were fitted to the test fixture for this series of measurements. Figure 8 shows the frequency response of the headphones with the REV33 inserted, normalized to the frequency response without the REV33. Satisfyingly, the frequency response matches fairly well with the frequency response I obtained with pure electrical measurement, that is, the device acts as a fourth-order low-pass filter with a corner frequency of about 10 kHz.
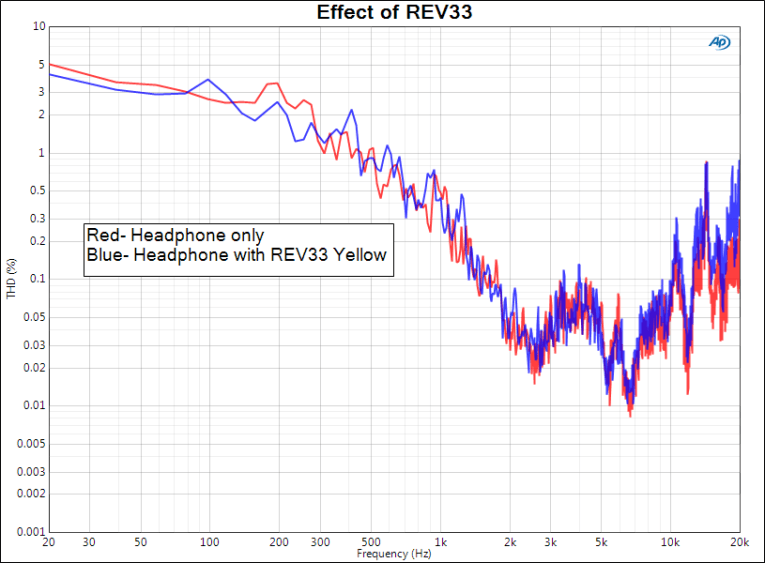
One thing I could not do electrically was to measure the effect of the accessory on acoustic distortion. The AECM206 allowed me to do this, and the results are shown in Figure 9. These were taken at an SPL of 85 dB at 1 kHz. As the data show, the effect on distortion is minimal.
Nit Picking
I can always find the dark lining in any silver cloud, and in this case, it’s the molded silicone ears. As I mentioned, the higher durometer ears didn’t work well with supra-aural headphones, refusing to bend back in the manner of human ears. The soft ones bent back, but also compressed in a rather unnatural way. Both had the issue of positional repeatability. When you remove and replace them from the fixture, they have to be oriented by eye, and the angle from vertical may not match perfectly from left to right and from setup to setup.
The second issue is an easy fix. Each molded ear has a small parting line where the mold is opened after casting. This line is close to the top of the ear. If a fiducial mark were added to the concentric circles in the test fixture, this would give a reference point so that the parting lines and fiducial marks can be aligned on both sides.
The first issue is a bit tougher, and is common to all headphone test fixtures I’m aware of. But what I think would be a solution for a better human ear simulation is practical, if not quite as easy as adding a reference mark. Feel your ear. If you’re a normal human, you’ll notice that it is not constant hardness in all parts, and most of it comprises a stiff cartilage overlaid by soft tissue. So the solution becomes obvious — use a two-part system for the simulated ear, with a stiffer inner layer overlaid by a softer outer layer.
There are at least two easy ways to manufacture this without extensive tooling since this is an item produced in the hundreds, rather than the millions. A 3D printed dual durometer version would work (or a hybrid, with the stiffer frame 3D printed and then placed in the mold for coating with soft silicone), or a stiffer polymer sheet can be die cut, then folded into the correct shape for a frame, which is then inserted into the mold for the softer silicone to surround it as before. The stiff polymer could also be thermoformed, albeit at a higher tooling cost. Note that my cavil applies to just about every test fixture using artificial pinnae, not just Audio Precision’s device. At some point, I would like to put my two-part molded ear into practice.
Overall Opinion
My two weeks with the AECM206 test fixture barely scratched the surface of its capabilities. Besides headphones, I would want to test various items of ear protection to determine their efficacy. This is a particular issue in my day job, where we have great concern about the effect of machine noise on workers’ hearing. I’d also want to look at noise cancellation in more detail, as well as the effects of pinnae shapes on frequency responses. It’s the sure sign of a useful device when one can come up with more and more questions as answers are obtained.
Although it doesn’t have the capabilities to be as accurate or repeatable as complete head-torso systems like the G.R.A.S. KEMAR or Bruel & Kjaer’s HATS because it will not simulate complete HRTF (most important for measurement of supra-aural and circum-aural headphones), at $11,000, this is much less expensive than similar alternatives, and is well within the reach of small labs doing work on headphones, hearing, and safety. I was both grateful for the opportunity to work with it and unhappy with the limited time I had to experiment. aX
Resources
“Application Note: Headphone Electroacoustic Measurements,” Audio Precision, 2016
Audio Precision, www.ap.com
M. Klasco, “Testing Headphones and Earphones: The G.R.A.S. 43BB Low-Noise Ear Simulator,” audioXpress, March 2016.
“REV33 Headphone Accessories- Measurements Part 1,” SYclotron Audio,
www.syclotron.com/rev33-headphone-accessories-measurements-part-1
Smyth Research, Ltd., www.smyth-research.com
This article was originally published in audioXpress, April 2018.