Even freeware systems such as Room Equalization Wizard (REW) do a remarkable job of improving the sound in home audio setups. We’ve come a long way from the manual third-octave setups of my youth. A relatively new entry into this market is Sonarworks, whose main offering — the Reference 4 Studio Edition — is clearly targeted to studio and mastering use, but can certainly be used in home audio setups with great success. The basic idea is that mixing and mastering through monitors that have frequency response peculiarities can result in recordings that don’t sound as good as they could — it’s like measuring the length of something with a crooked ruler. The intent of the Reference 4 software is to straighten the ruler out, giving a recording engineer a neutral and accurate tool to evaluate the sound of a mix.
The Products
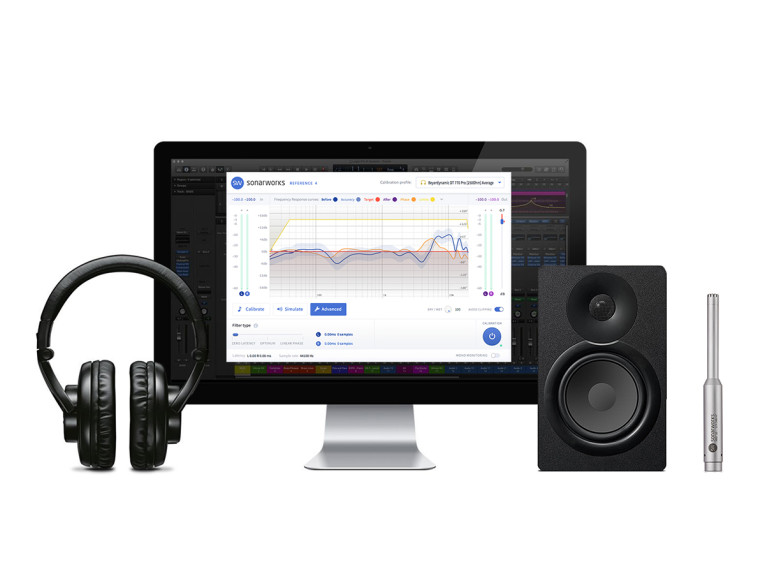
Sonarworks Reference 4 has four basic built-in functions. First, software to make measurements of the speakers in the monitoring room. Second, an engine that takes the results of these measurements and converts them to a custom frequency-response correction plug-in to use with any DAW having the standard capability of using VST, AU, AAX, or RTAS formats. Third, a mode called Systemwide, which only works on audio outputs, but does so for all computer audio functions, not just the DAW. In Windows, it uses Direct Sound to implement the frequency response correction on all outputs. For Macs, it works as a Core virtual audio device with no inputs and two outputs to accomplish the same goal. And fourth, for both the plug-in and Systemwide modes, Sonarworks Reference 4 contains a collection of pre-determined frequency response correction curves for the most popular headphones.
Several versions of the software are available at different price points. The full Reference 4 package incorporating all these functions sells for $249. A serialized measurement mic can be added for an additional $50. For headphone mastering where there’s no need to do measurements and generate custom frequency response correction curves, the Reference 4 Headphone edition incorporates the fourth function only and sells for $99. Sonarworks also sells the Reference 4 system bundled with Sennheiser HD650 headphones for $699, which includes an individual calibration for the headphones.
software enables the user to enter
gender and age, then shows an
equalization curve. This was depressing.
Speaking of which, Sonarworks will also provide you with an individual calibration for your headphones for $99 extra, plus shipping back and forth to their headquarters in Latvia. They claim that individual calibration will reduce frequency response deviations from ±3 dB using the general calibration curve to better than ±0.9 dB. Additionally, Sonarworks resells a range of high-quality headphones that are also supplied with individual calibration profiles.
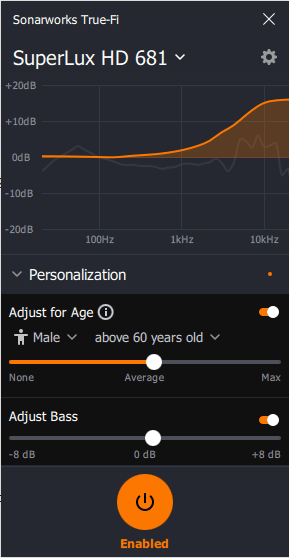
For a typical headphone-oriented audio enthusiast, as opposed to a music producer, Sonarworks offers a product called True-Fi, which includes the same group of headphone calibration curves as the Reference 4 Headphone Edition, but only has Systemwide capability (i.e., no plug-ins for DAWs). Note that although you can default to an equalization to a flat frequency response, the Reference 4 (and True-Fi) software has the capability of equalizing to a user-specified target response.
There are also some pre-loaded target responses corresponding to typical responses for large and small home speakers, as well as the B&K 1974 Optimum Hifi Curve (which basically is a downward tilt in the frequency response to make up for beamy tweeters). So if you want something like a house curve, or to master with particular target speaker types in mind, you can easily implement that.
Additionally, the software enables you to simulate the playback sound from six different popular headphones and loudspeakers so that you can see how your mix sounds to users of these products. I will confess to spending a lot of time playing with these simulations and (very unkindly) laughing at how well some pretty awful-yet-popular products could be mimicked. In my opinion, this is a very useful and unique feature.
The True-Fi version also has an EQ function meant to compensate for age- and gender-related presbycusis. That strikes me as not terribly useful for someone who wants to recreate live sound since “live sound” is judged by those same defective ears (see Figure 1), but it’s certainly a sobering reminder of one’s humanity.
The Technology
The core of Sonarworks’s technology is outlined in its US Patent 9,380,400, “Optimizing Audio Systems,” and the pending application 2016/0366518, “Method of, and Apparatus for, Determining an Equalization Filter,” with company principal Kaspars Sprogis listed as the inventor. Essentially, their method consists of measuring frequency response at a variety of points, then deriving the equalization curve from a weighted average of responses gathered at those points. The weighted averages can be manipulated to only incorporate parts of the audio spectrum, if desired (e.g., a measurement from a meter away from the listening spot might have the top octave removed from the weighting), and the weighting can be varied as a function of the measurement location for that particular curve (e.g., frequency response curves from a meter away from the listening spot would have a lower weighting than those taken 10 cm from the listening spot). For loudspeakers, the user measures them in situ so that room acoustics and angle to the listening position can be accounted for in the response corrections.
One interesting twist is that the Reference 4 system uses signals to automatically determine the spacing between the speakers, the distance from the speakers to the listening spot, and during the measurement cycles, the position of the test mic at each test point so that weightings can be accurately calculated.
This triangulation function makes the measurement process go very quickly and painlessly. I was able to obtain the required 24 measurement points in about 10 minutes. Additionally, since the software “knows” where the mic is placed at each point in the measurement process, it can rationally average out peaks and dips due to reflections, weighting them more heavily toward measurements near the listening position.
For headphone calibration curves, the process is similar, but since the user is likely unable to be able to do headphone measurements, this is done at Sonarworks and the calibration curves are provided. As with the speaker corrections, Sonarworks’ method consists of measuring the response in multiple locations within the headphone cup and similarly taking a weighted average to determine the final correction curve.
According to its website, this is done with multiple samples of each headphone model so that an average calibration can be determined. Because there’s a lot of response variation between headphone cavities with different pinnae in them (and no two pinnae are alike), Sonarworks also has the correction curves judged by a listening panel. Rudi Putnins at Sonarworks says, “We use different measurement methods depending on headphone type and even then a committee of no less than three trained audio engineers check the outcome by ear to correct for measurement artefacts. They all have to greenlight the curve, before we can publish it. Sadly, there have been cases where we’ve chosen to not publish the calibration profile, as it wasn’t to our standards. Most often it happens due to high sample-to-sample variance or hard-to-correct resonances.”
Interestingly, you’d expect that if two different types of headphones are equalized to give the same frequency response, they would sound extremely similar. Sonarworks goes a bit farther and claims, aside from any issues with high distortion in some headphones, that once equalized, different model headphones will essentially sound the same. This is not an unreasonable claim, given the human ear’s extreme sensitivity to frequency response and relative insensitivity to low levels of distortion.
Sonarworks Reference 4 Setup
The first step is installation and license activation. This is a bit convoluted, but can be done relatively quickly via a download manager application provided by Sonarworks, along with the activation code. If your studio computer is not hooked to the Internet, activation will require a separate computer to obtain the validated key, which is then transferred to the studio computer. The license with purchase is valid for three computers, which for someone like me (with a separate lab and living room setups) is a great convenience.
Unless you’re going to just use the Reference 4 system with headphones, the first step is to set up the speaker measurement to generate the correction curves. I did this on two setups, my lab/studio monitoring (a pair of Vanatoo Transparent Zeros used near-field) and my living room (four-way floor-standing speakers based on NHT M3.3 with the listening spot about 3 meters away). The software allows the option of using a mic provided by Sonarworks, serialized to enable its frequency response to be automatically accounted for, or a user-chosen mic, with provisions for entering calibration data. In my testing, I used a reference mic I had on hand, the PCB Piezotronics 376A32 1/2” phantom power condenser mic, which has a very flat frequency response and low distortion as well as nearly identical response on and within ±45° off axis.
The measurements begin with a short tutorial on mic positioning and a setup checklist. I tried cheating a bit on one checklist item — make sure you’re using the same interface for recording and playback. This is because my usual analog interface (a Scarlett 2i2) used for phantom-power mics, does not have an SPDIF output to send to the optical input I use for my lab/studio speakers or the AES/EBU input to the electronic crossover for my living room setup. Initially, I tried using the Scarlett for the mic and a separate USB-connected digital coax and optical adapter, which I soon found out caused the measurement process to not work correctly.
I got nonsense for the speaker and listening seat spacing. The timing is apparently quite critical. The moral of the story is that when they say to use the same interface for both, they mean use the same interface for both! The software then has you set the input and the output channels for the mic and the loudspeakers, as well as the sample rate, which needs to be 44.1 kHz for these measurements.
Next, place the mic at the listening position, and the software begins test signals, a combination of clicks and sweeps, for the purpose of setting volume and mic sensitivity levels. The user can select the delay time between the triangulation signals (clicks) and the measurement signals (sweeps) if it’s necessary for (say) positioning the mic, then returning to the computer before starting the next measurement step.
In this first step, the software will give an error message if the levels aren’t sufficient to give a high-quality result. Confusingly, the error is stated as “measured high signal to noise ratio” when it’s actually the opposite. I attribute this minor hiccup to language issues (Sonarworks is in Latvia), of which a few pop up here and there. The prompts do, however, tell you to increase the sound level or the mic gain, so this is more of an aesthetic quibble on my part.
Once the test levels are set, the software directs you to place the mic close to each speaker in turn while test signals are played. The distance between the speakers is then automatically determined and displayed. If the distance displayed is not exactly correct, the user can adjust it manually, but if it’s more than a few centimeters, that’s usually an indication that something is not set correctly. (This is how I discovered that my setup using two different interfaces for mic and speakers was not going to work.)
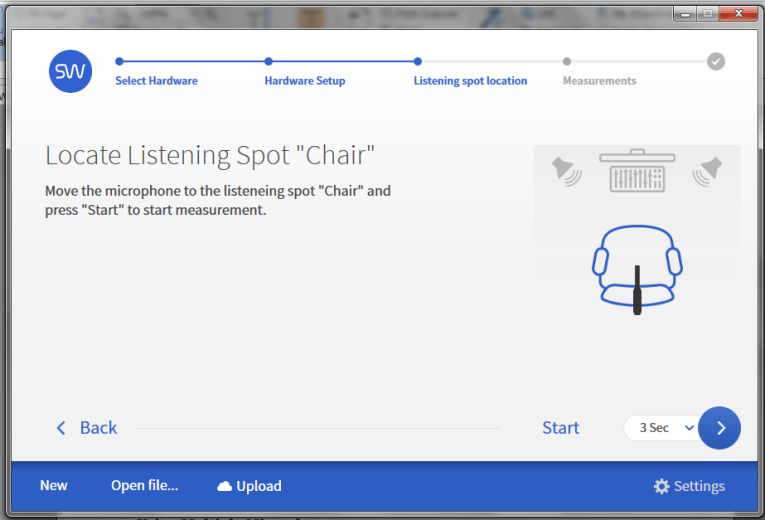
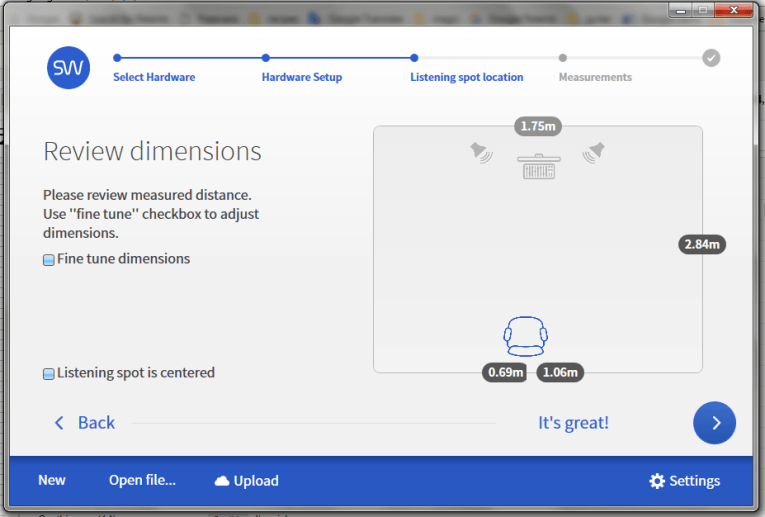
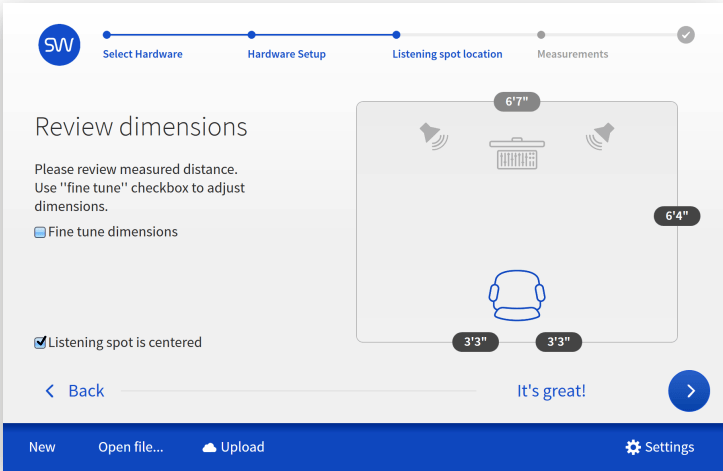
With the speaker-to-speaker distance determined, the software directs you to place the mic at the listening position, then triangulates on that position to set it as a reference (see Figure 2). As before, the software enables you to adjust the triangulated distance to the listening seat, and if it’s off by more than 10 cm, this is an indication that something may be amiss in the measurements. This was the case when I attempted to do a measurement in my lab at a distance of 3 meters or so from the speakers. The display showed that the mic was very far from the center line between the speakers, when in reality it was dead center (see Figure 3). I traced this to some room reflections, which confused the triangulation. Adding some acoustic panels at a critical spot cleared up the issue.
Nonetheless, this brings up an interesting point that I’ll return to later. And in my much less reflective living room, as well as in the lab speakers’ near field (1.7 meters distance, which is representative of typical studio use), the triangulation functioned perfectly with no extra effort being needed (see Figure 4). As you can see here, the user has the option to select metric or Imperial units.
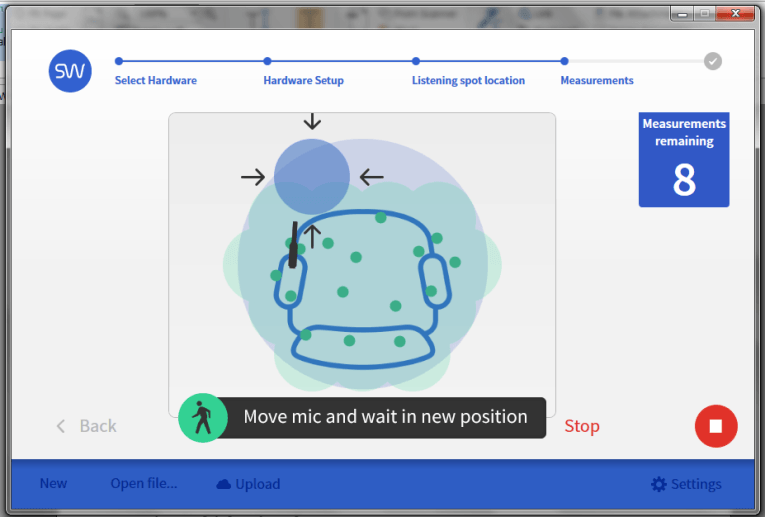
Now the fun begins. The software guides you through 24 separate measurements. The software display draws a circle in the area where the mic needs to be placed for each measurement and the triangulation function shows you where the mic actually is so it can be moved to the desired area (see Figure 5). Once it’s located within the circle, the emitted sounds from the speakers change from the triangulating clicks to frequency sweeps after the selected delay time. The software then directs you to place the mic in the next spot, and so on until measurements at 24 points have been completed.
I should note that Sonarworks suggests using a mic stand, which is fine except that measurements in the seating area become problematic. After some experimentation, I found that if I attached the mic to the end of an approximately one meter boom, I could stand well behind the listening chair and move the mic around to the various measurement spots without my body (which over the years has transformed from reflective to absorbing) interfering too much with the measurement. At the same time, I could also see the computer screen enabling me to adjust the mic positioning to the spots where the software directed.
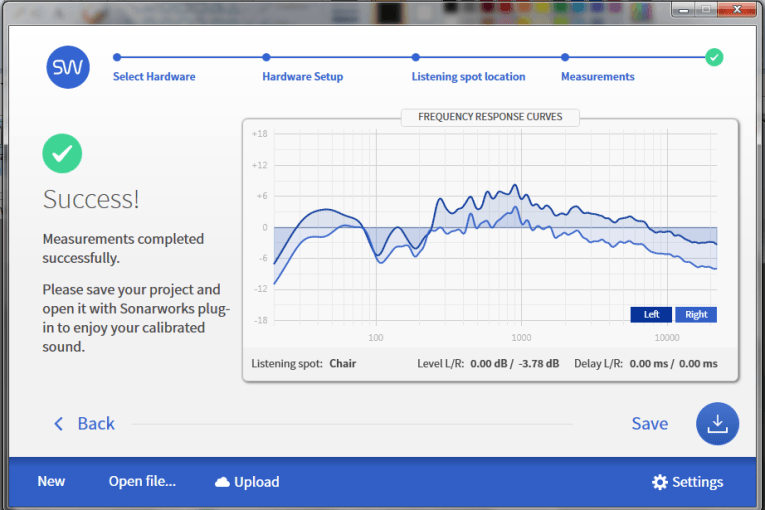
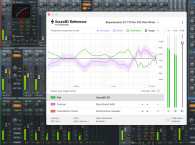
With all 24 measurements completed, the software returns the measured response used for the correction curve (see Figure 6). To more clearly demonstrate that the channels are individually measured and calibrated, one channel’s gain in my living room system was reduced by 4 dB or so, which is reflected in the measurements. For my actual monitoring work, I used the Vanatoo speakers in the near field (see Figure 7).
Sonarworks Reference 4 in Action
For the in-use testing, I tried the software in two ways — as a VST plug-in for my DAW (Adobe Audition) and in the Systemwide mode. The results either way were the same, so I ended up just using Systemwide, which is very easy to customize or to switch in and out for comparisons. Your preferences might differ if you’re doing more intensive mixing and mastering than I do, so it’s nice having both options. But be sure to pull out the plug-in when the mixing or mastering is completed!
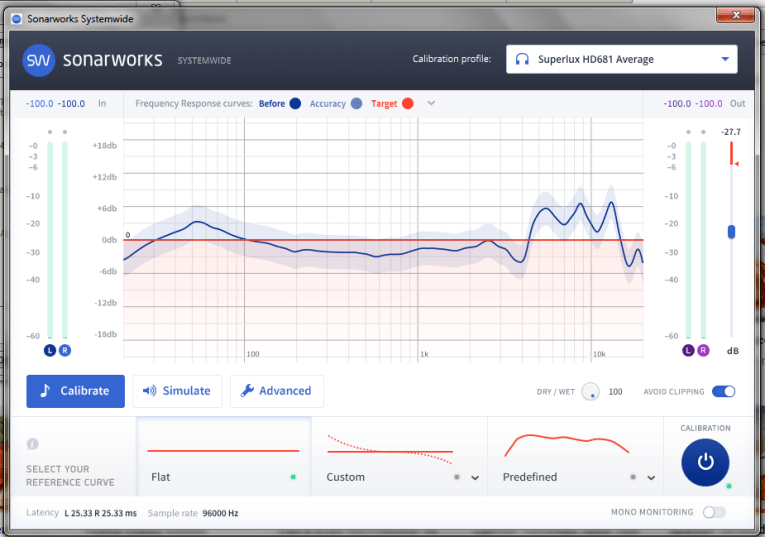
I first tried using the Systemwide with the preloaded correction curve for my cheap Superlux headphones, which can be seen in Figure 8. Although I have a healthy skepticism about headphone response measurement in general, and Sonarworks’s particular claim that the equalization will make headphones of different models sound the same, I have to admit that the sonic results were subjectively spectacular.
The cheap headphones didn’t sound cheap at all and were almost unrecognizable. I didn’t have a reference set of headphones on hand for comparison, but even if the correction didn’t make the Superlux sound exactly like Stax, it was still very impressive. I’d suggest that the $79 True-Fi software (which uses the same correction curve) and a decent, inexpensive pair of headphones would be an amazing listening bargain for audio enthusiasts.
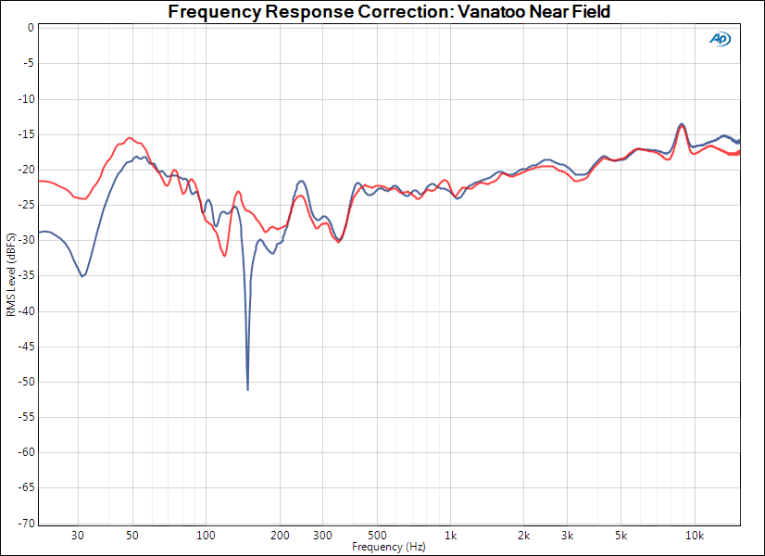
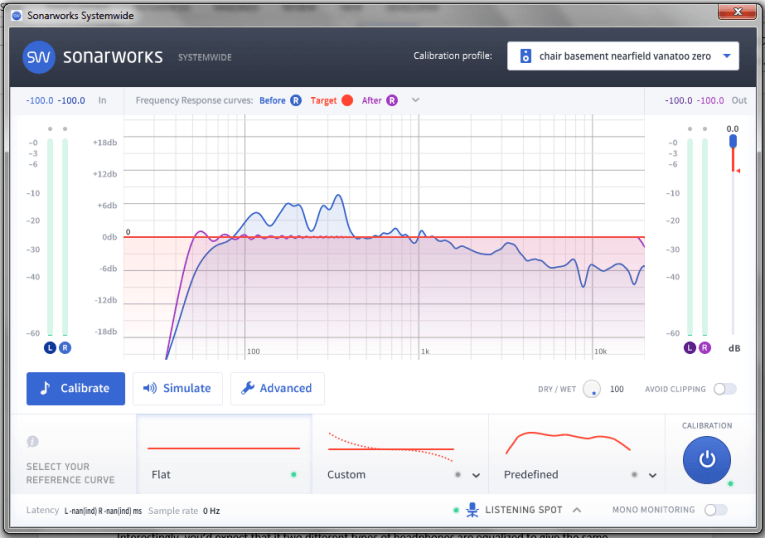
Next, I used the Vanatoos and selected the correction curve used for near-field monitoring, shown in Figure 7. For curiosity’s sake, I checked the response using an Audio Precision APx515 and got the results shown in Figure 9. This matches the correction shown in the Systemwide display, so the latter can be presumed to be the actual correction used.
From a subjective standpoint, the correction did exactly what you’d expect from the curves — it removed the slow treble droop, compensated for the tweeter’s 9 kHz dip, and smoothed out the bass. This came across as an increased clarity and liveness, but for recordings made with less-than-stellar microphones, the sound could be a bit fierce. This means the producer needs to know what the sound really is and that can help guide improvements in the mix. Beware though, once you get used to a colored sound quality and then fix the spectral balance, it may sound odd and unfamiliar until your ears adjust.
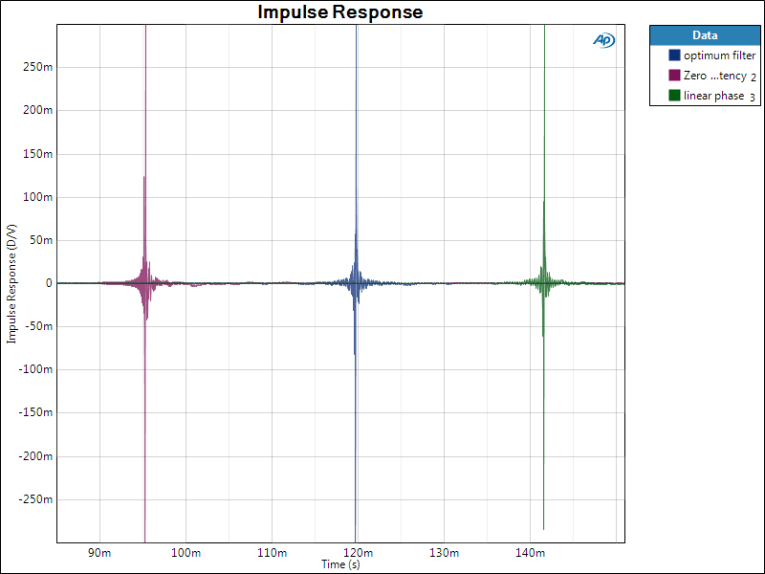
Both Systemwide and the plug-in have three filtering options with varying amounts of latency, which trades off latency for phase response accuracy. I measured the impulse response for the correction using each of the three filtering options provided (see Figure 10). Note that the Audio Precision APx515 has a delay before the impulse, so this graph should be interpreted in a relative sense. The “zero latency” option really does have close to zero latency, with the “optimum” filter having about 24 ms of delay, and the “linear phase” filter having about 47 ms of delay. Sonarworks recommends the “optimum” option for most uses, but “zero latency” should be chosen for live tracking or overdubbing.
One other thing of note here — as can be seen from the impulse responses, the Reference 4 software only does a frequency response correction. There is no time domain correction for things such as reflections, otherwise the impulse responses would indicate reflections at several milliseconds from the main pulse to compensate for wall and floor reflections.
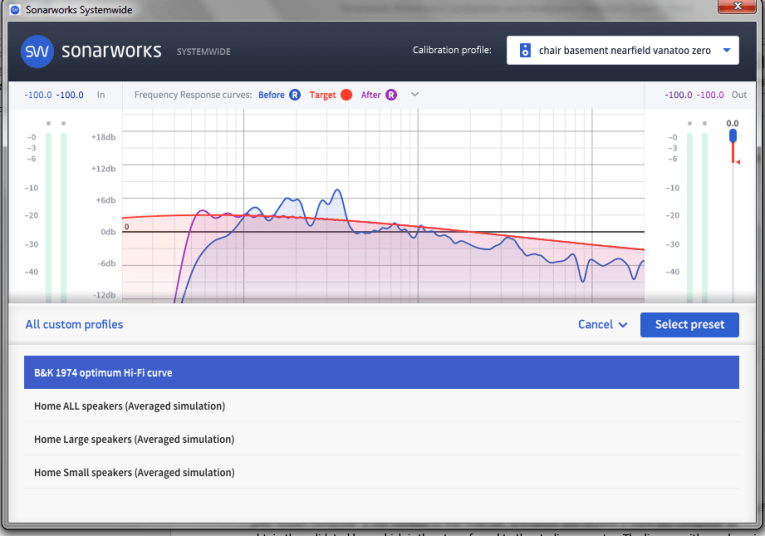
As I previously mentioned, the Reference 4 software enables the user to select a correction target other than flat, including the 1974 B&K Optimum Hifi Curve. I noted that the uncorrected response of my Vanatoo monitors generally followed that curve, and indeed, when I set it as a target, the difference between corrected and uncorrected became much more subtle (see Figure 11).
Summing Up
There’s a lot of competition in the room/loudspeaker correction software market. Sonarworks’s claimed advantages of the Reference 4 Studio Edition are a larger sweet spot for listening and a rapid and mostly foolproof measurement/analysis cycle. I could not really confirm the former, but the latter was certainly true. The triangulation function is very slick, and the graphical display of mic positions made the process very straightforward.
The major shortcoming is the lack of time domain correction that can be had in packages such as the ARC 2.5 Room Correction System, recently reviewed by Ron Tipton (audioXpress, March 2018). But for me, at least, the differences in the resulting sound were close to non-existent in my near-field monitoring (where, really, this is speaker correction rather than room correction) and very slight in my use as room correction software.
So the choice really came down to ease of generating the correction curve and the feature set that could be used in mixing and mastering, where the advantage is clearly to the Sonarworks package. I very much appreciated the ability to set my own reference curve for the correction so that I could optimize the master with specific listening targets in mind. The Systemwide function in Sonarworks was also incredibly convenient, allowing me to easily use this package for normal music listening and do mixing and mastering without the risk of me forgetting to remove the plug-in when I was finished.
Though it’s an enhancement, not a substitute for high-quality monitors and basic room treatment, for studio work the Reference 4 is a clear winner. Highly recommended. aX
This article was originally published in audioXpress, July 2018.
References
K. Sprogis, US Patent 9,380,400 “Optimizing Audio Systems,” issued 2016,
http://ow.ly/156v30kjlEk
K. Sprogis, H. Bems, M. Popelis, US Patent Application 15/122,163 “Method of and Apparatus for Determining and Equalization Filter,” published 2016,
http://ow.ly/VYBN30kjlTC
Sonarworks Reference 4, www.sonarworks.com/reference
Tipton, Ron, Fresh From the Bench: IK Multimedia ARC 2.5 Advanced Room Correction System, audioXpress, March 2018
http://www.audioxpress.com/article/fresh-from-the-bench-ik-multimedia-arc-2-5-advanced-room-correction-system